How to Transfer Photos from iPhone to Mac (Complete Expert Guide)
You can transfer photos and videos from iPhone to Mac or MacBook using a USB cable with the Photos app or Finder, wirelessly with AirDrop or iCloud Photos, or selectively using Image Capture. Each method serves a different use case depending on file size, speed, storage, and long-term syncing needs. Choosing the right method prevents duplicates, preserves quality, and keeps your photo library organized.
This guide explains every reliable method, compares them clearly, and helps you choose the right approach for your workflow, not just the fastest one.
Why You Should Transfer Photos from iPhone to MacBook
Your iPhone camera improves every year, but storage does not scale the same way. Over time, photos and videos:
- Consume iPhone storage silently
- Slow down backups and syncing
- Become harder to organize or edit
When you copy photos from iPhone to MacBook, you gain:
- A larger screen for editing and reviewing images
- Better organization using albums and folders
- A secure local backup independent of iCloud
A Mac is not just storage, it’s control.
Before You Import Photos from iPhone to Mac
Before you import pictures from iPhone to Mac, clean up first. This single step prevents clutter and duplicate chaos later.
Do this on your iPhone:
- Delete blurry or repeated shots
- Remove old screenshots and unnecessary downloads
- Keep only what you actually want to preserve
A clean source device makes every transfer method faster and safer.
Method 1: USB Cable + Photos App (Most Reliable)
The most common ways to transfer pictures from your iPhone to your Mac involve connecting your devices with a USB cable.This is the Apple-recommended method and the best option for large photo libraries.
How to import photos from iPhone to Mac using Photos app
- Connect your iPhone to your Mac using a USB cable
- Unlock iPhone and tap Trust This Computer
- Open the Photos app on Mac
- Select your iPhone from the sidebar
- Choose Import Selected or Import All New Photos
This method:
- Preserves full resolution
- Prevents recompression
- Allows album selection during import
Best choice when you want clean, structured imports.
Method 2: Finder (macOS Catalina or Later)
Starting with macOS Catalina (10.15) or later, you can sync your iPhone with a Mac using Finder. Follow these steps to sync photos from your iPhone to your Mac.Finder works best when you want controlled syncing instead of one-time imports.
How to copy pictures from iPhone to Mac using Finder
- Connect iPhone to Mac
- Open Finder and select your iPhone
- Click the Photos tab
- Enable Sync Photos
- Choose albums or folders
- Click Apply
Finder is ideal for:
- Ongoing photo management
- Preventing repeated imports
- Keeping albums consistent
Method 3: Image Capture (Selective & Fast)
Image Capture is perfect when you want to transfer photos without touching the Photos library.
How to transfer pics from iPhone to Mac with Image Capture
- Connect iPhone via USB
- Open Image Capture
- Select your iPhone
- Choose destination folder
- Download selected or all images
This method gives you:
- Folder-level control
- Zero auto-organization
- No duplicates if used correctly
Best for professionals and designers.
For additional official guidance on how to Transfer Photos from iPhone to Mac, Apple explains safe practices in its support documentation: Apple Support.
Method 4: AirDrop (Wireless & Instant)
AirDrop is excellent for small batches.
How to transfer photos from iPhone to Mac wirelessly
- Enable Wi-Fi & Bluetooth on both devices
- Select photos on iPhone
- Share → AirDrop → Choose Mac
AirDrop is fast, but:
- Not suitable for hundreds of photos
- No album structure
- Manual selection required
Use it for quick sharing, not archiving.
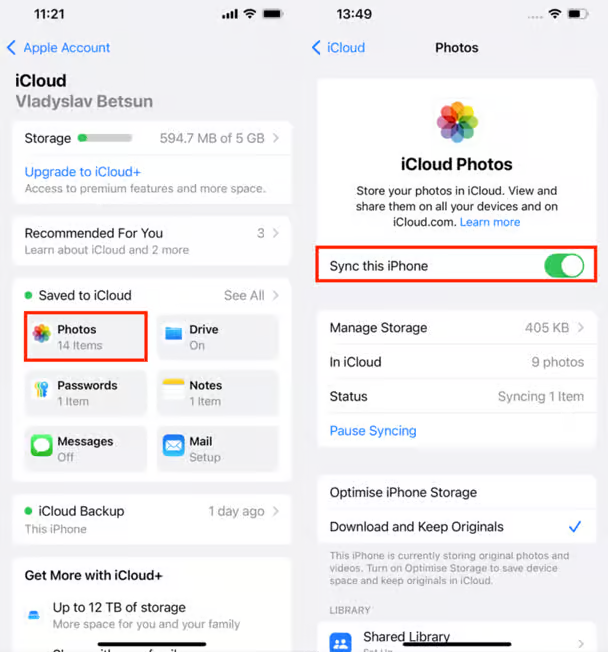
Method 5: iCloud Photos (Automatic Sync)
Another way to move photos from an iPhone to a Mac is with iCloud. iCloud Photos can do all the heavy lifting. However, if you’ve got over 5GB of photos and videos, you’ll need to upgrade your storage plan, paying anything from $0.99 per month for 50GB to $9.99 for 2TB of cloud storage.
How to import photos from iPhone to Mac using iCloud
- Enable iCloud Photos on iPhone
- Enable iCloud Photos on Mac
- Photos sync automatically
Important:
- Requires enough iCloud storage
- Deleting on one device deletes everywhere
- Best for continuous access, not one-time transfer
Comparison Table: Best Way to Transfer Photos from iPhone to Mac
| Method | Cable / Wireless | Best For | Risk of Duplicates | Quality | Expert Verdict |
| Photos App (USB) | Cable | Large libraries | Very Low | Original | Best overall |
| Finder Sync | Cable | Album syncing | None | Original | Advanced users |
| Image Capture | Cable | Selective transfer | None | Original | Power users |
| AirDrop | Wireless | Small batches | Low | Original | Quick sharing |
| iCloud Photos | Wireless | Auto sync | Medium | Original | Ongoing access |
When our design team at Safecare shifted fully to MacBooks, Mughees faced a common issue. He transferred photos multiple times using the Photos app, unknowingly re-importing the same files.
Within days, his Mac library was filled with duplicates.
A senior team member reviewed his workflow and switched him to Image Capture for selective imports and Finder sync for albums. The result was immediate clean folders, no duplicates, and faster access.
The lesson was simple:
The problem wasn’t the Mac. It was the method.
Common Mistakes Users Make
- Importing without cleaning iPhone first
- Using AirDrop for large libraries
- Mixing iCloud sync with manual imports
- Re-importing without checking “New Photos Only”
Avoid these, and transfers stay smooth.
Final Thoughts
Transferring photos from iPhone to Mac is easy.
Transferring them correctly is what matters.
Choose the method based on:
- Size of your photo library
- Need for organization
- One-time vs ongoing sync
Use this guide as your reference, not trial and error.
Explore More MacBook Guides: Chips, Models, guide & Prices in 2026
Before buying or upgrading in 2026–2027, explore Mega.pk’s detailed Apple guides:
- Apple M5 vs M4 Chip Comparison
- MacBook Air vs MacBook Pro (Buying Guide)
- MacBook Pro 14-inch vs 16-inch Breakdown
- MacBook Model Identification (Serial Checker Guide)
- Updated MacBook Prices in Pakistan
- Complete MacBook Buying Guide
- What Is a MacBook? (Beginner Overview)
- Apple M3 chip
- Understanding the Apple M5 chip and Apple M4 chip
- How to Reset Macbook (Complete guide)
- How to check Battery Cycle (Guide)
- How to take screenshot on mac(Complete guide)
- How to copy,paste or right click on Macbook
- How to delete apps on macbook
FAQ – Transferring iPhone Photos to a Mac Computer
Q: Can I transfer photos from my iPhone to a Mac running an older operating system?
A: The steps outlined in this guide are specifically for Macs running the latest operating system. However, you may still be able to transfer photos using alternative methods such as iCloud, AirDrop, or third-party applications. The steps for transferring photos on a Windows computer vary.
Q: Will transferring photos from my iPhone to my Mac delete them from my iPhone?
A: By default, the Photos app gives you the option to delete photos from your iPhone after importing them to your Mac. However, you can customize the import settings in Step 6 to choose whether or not to delete the photos from your iPhone.
Q: Can I transfer photos wirelessly without using a cable?
A: Yes, you can transfer photos wirelessly using iCloud or AirDrop. These methods require both your iPhone and Mac to be connected to the same Wi-Fi network and have the necessary settings enabled. Refer to the Apple support website for detailed instructions on using these features.
Q: How long does the photo transfer process usually take?
A: The time it takes to transfer photos from your iPhone to your Mac depends on the number and size of the photos being transferred. It can range from a few seconds to several minutes. The progress bar in the Photos app will give you an estimate of the transfer time.
Q: Can I transfer photos from my Mac to my iPhone using the same method?
A: Yes, you can use the Photos app on your Mac to transfer photos from your Mac to your iPhone. Simply connect your iPhone to your Mac, open the Photos app, select the photos you want to transfer, and click on the “Import” button. The imported photos will be available on your iPhone’s Photos app.
Q: What should I do if the Photos app does not detect my iPhone?
A: If the Photos app does not detect your iPhone, try the following troubleshooting steps:
- Ensure that your iPhone is unlocked and on the home screen.
- Check that the Lightning cable is securely connected to both your iPhone and Mac.
- Restart your iPhone and Mac.
- Update your iPhone and Mac to the latest software versions.
- Try using a different Lightning cable or USB port on your Mac.